Watch How I Upload Custom Templates to My reMarkable
Since buying my reMarkable, almost a year ago, and figuring out how to connect to my device, change out my sleep screen image, upload custom templates, writing my own script to make the entire process simpler (part one and two), and handling reMarkable updates… I’ve been meaning to make a video showing the process. I figured no time was like the present and created this hoping it would help make the entire process simpler for you. Hope this helps you upload, and maintain, your own custom templates!
Update: Apple App
That said I've since come out with an iOS/macOS app that you can use to change out your templates and screens with a simple button press while remembering them for the next update. More information can be found about it here with a direct link to the App Store here.

I find I learn better with written blog posts over videos so I wanted to include the transcript for my video. For your ease I also included:
- As the video was split into chapters I also started each chapter, in the transcript below, with a linkable header so you can find the sections easier in this post and know where they are in the video. Format: mm:ss – minutes and seconds into the video
- Each paragraph of the transcript shows the starting timestamp (not linkable) so you can find the related clip easier in the video. Format: h:mm:ss – hour, minutes, and seconds into the video
- I’ve added hyperlinks to whatever was mentioned in the video.
- Any more obscure links have been added below the paragraph it is mentioned in.
- I’ve also included additional helpful links that weren’t mentioned in the video. These start with “
Learn More:” so you can find them easier.
Anyway, here it is!
The Video
Update: I conducted an experiment to see which file type (PNGorSVG) would be used when exporting a notebook page from the reMarkable. Here are the results if you’re also interested!
Closed Captioning
In case you'd rather read or use the text to find your localtion (ctrl f to search).
00:00 – Introduction
0:00:01.360 – Hey everyone! It’s morning where I’m from so I hope you’re having a good morning and a great day.
0:00:06.640 – I bought my reMarkable about a year ago, received it after Christmas, and while waiting for it to arrive I fell in love with the idea of being able to customize my sleep screen image. This meant, when it did arrive, in addition to learning how to use it, I was super excited about figuring out how to connect to it via SSH and then change out the sleep screen image itself. After that I quickly looked into making custom templates and I made some blog posts to show people how to do it. That template blog post has become my most popular one.
0:00:37.289 – Anyway, since then I made a bash script that I can run from my terminal that uploads any images that I want to use as a template to my reMarkable and generates the JSON snippet that I need to still put into the templates.json file, but, that said, it so much easier.
Here are the links to the mentioned script explanation blog post.
- Part One: Quickly Generate a JSON Template Code Snippet for Your reMarkable
- Part Two: Quickly and Easily Upload Template Images to Your reMarkable
0:00:55.348 – That said, I’ve gotten a couple emails and several comments asking me to explain different parts of my posts so I wanted to make a video walkthrough, I had been meaning to for awhile, just to combine all my posts together and show you how I do it.
01:09 – Overview
0:01:09.907 – So to quickly go over the reMarkable when you open your reMarkable and go into layers and go to switch out the templates you’ll see a list of all the default templates that reMarkable has. At the top you’ll see all the categories and a general one All. If you go to All you see all the templates on your reMarkable. If you click on the category itself you’ll see that specific one.
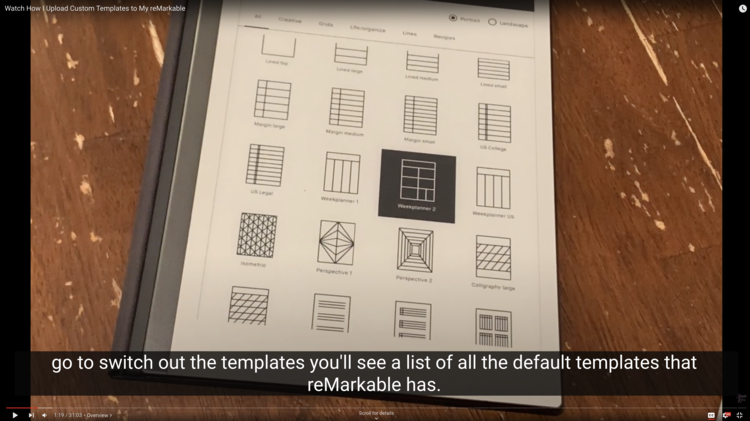
0:01:31.829 – The reMarkable doesn’t officially support any templates. When you upload it you’ll need to know some specific details about your template. Obviously, you’ll need to upload a PNG file for your template. You’ll also need to know what its name is, what its filename is, what it’s icon code is, what categories it’s in (it can be in one or more), and if it’s in landscape or portrait mode.
0:01:54.137 – My script takes in the structure of your folders to determine what its filename is and what its name is. It assumes all your templates are in portrait mode so it sets a landscape boolean to false, because it’s not in landscape mode. It also assigns the same icon code to all the custom templates. The icon code is what you see on your reMarkable when you’re scrolling through your templates, because, like I said, custom templates aren’t officially supported there’s a limited amount of icon codes and if you’re uploading a custom template there’s a high chance none of the icon codes will make sense so all that to say I just set one. If you want to go into the script later and change that icon code to a different one you can but it just batch assigns it all.
Learn More: This reMarkable wiki has an image displaying all the possible icon codes for system 2.3.0.16.
02:34 – Organization and Reasoning
0:02:36.650 – Anyway, to start I’m going to go over how I organize my templates to upload.
0:02:41.478 – First I create a folder. Let’s call it myTemplates and to create it I just right clicked on my desktop. In this folder I’ll want to create any folders I want to use for my categories. In this case I just right click to create, but you could also do it through the terminal. If you haven’t used one it might look like this. I have installed iTerm (and fish shell) too so the one I prefer looks like this. I’ve also turned on a couple things so it might look different than your terminal. I’m going to close the default terminal. And then I’m gonna use cd to change directory, because folders are also called directories, and I’m changing to the desktop and then to myTemplates. If you want to list everything in a directory it’s ls, but as you can see by the window there’s nothing in it yet. If you want to make a directory it’s mkdir… oops. And then I want to create one called Custom and I want to mkdir, make directory, one called 2021.
0:03:44.403 – Then within these categories I want to add the PNGs that I’m going to be using on my reMarkable. For my custom ones I’m just going to copy some that I wanted to use before.
![Screenshot of the video shows a terminal on the left with mk (make directory) commands. On the right you can see the two created directories within the main myTemplates one. The caption at the bottom says: "Then within these [mouse clicks] categories I want to add the PNGs that I'm going to be using on my reMarkable."](https://www.simplykyra.com/content/images/wordpress/2021/12/compressed_Screen-Shot-2021-12-13-at-12.32.17-PM.png?resize=750%2C423&ssl=1)
0:04:03.251 – Basically three:
- from the PDF I got from my Balanced Life one. It’s a great one at the start of the year to show your intent for the year.
- A little kids’ one
All About Methat I had the kids fill out on paper last year and I’m excited to start creating a reMarkable version. - And then just a weekly PDF I made through a third party website (NoTeTo). I will link it below.
0:04:24.525 – I create the Custom category to hold all my custom templates. I also created a 2021 one to hold any templates specific to this year.
0:04:36.419 – I mentioned a Balanced Life membership. She comes out with a new calendar every year (edit: month) that I like to follow so at the end of the year I plan to export the whole year’s workout calendars and then I can delete all my 2021 templates and start a 2022 category.
0:04:53.166 – The reason I’m keeping the names simple and small and the reason I’m only having two custom categories is because of the reMarkable itself. The reMarkable doesn’t officially support templates. This means that they don’t also have to make it easy for you to upload it or display it.
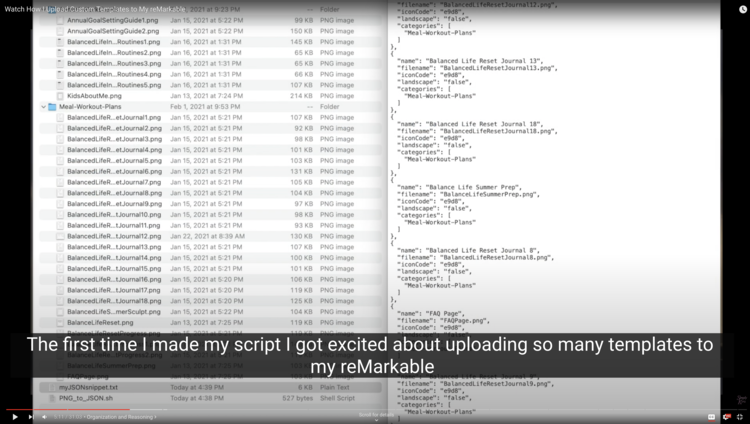
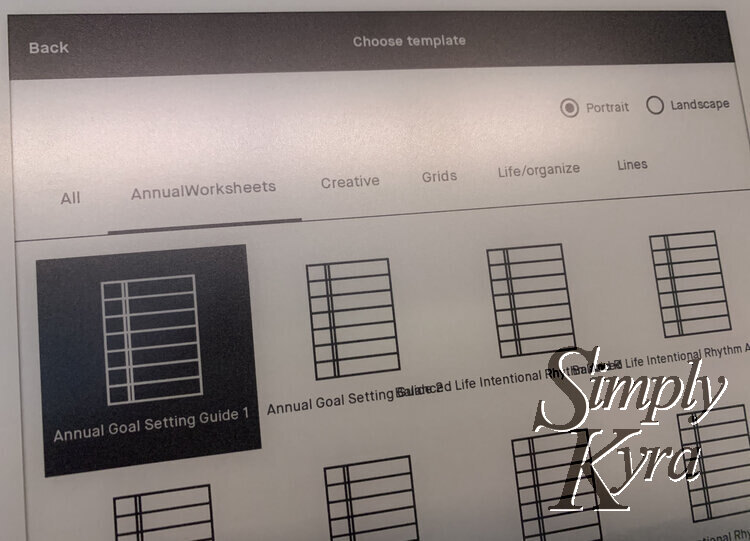
0:05:10.750 – The first time I made my script I got excited about uploading so many templates to my reMarkable and I made long descriptive names to explain what each template is since the icon code doesn’t show it and I also made several different categories so the category itself would help explain. When I did upload it I was dismayed to realize that the tabs across the top don’t get smaller and don’t create a second row so whatever doesn’t fit on the first row just doesn’t get shown. So any templates in the hidden categories, whether it’s a default category or your category, aren’t shown and you can only access them by going to the All tab. If you’re uploading a lot of templates this can be difficult to find.
0:05:51.985 – In addition the names of the templates are centered under the icon code, but it doesn’t look at the edge so when I had long template names they overlapped and looked really confusing. As such, I’ve decided, to just limit myself to two categories, which was fine before but since the last update I’ve noticed, once I added these two categories, that the last default category is (now) overlapping with the portrait radio button so I might need to, in the future, go down to only one category; depends what they do and how they lay it out.
0:06:23.594 – Anyway, with this we can make our script!
0:06:25.766 – I don’t know how you normally make a file. For me I go back to my terminal which is, of course, on desktop/myTemplates and I use the editor Vim.
Learn More: Daniel Miessler’s Learn Vim For the Last Time: A Tutorial and Primer Or there’s also games online like VIM Adventures. I did the free part of Vim Adventures a while back but didn’t go any further. Currently, I look online for what I want to do and learn as I go.
06:35 – Bash Script: Creation, Execution, and Contents
0:06:36.000 – Vim is a bit difficult to go around in so you can use whatever you want to use. To do mine I’m going to say vim myScript and then end it with .sh. Whatever you call your script, and you can call it whatever you want, you need to end with .sh.
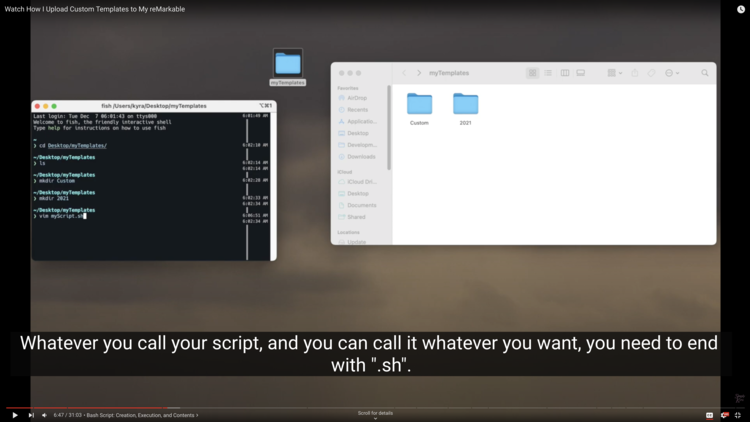
0:06:51.015 – And then, I’m not going to write anything, I’m going to press esc, :wq. And w is for save and q is for quit. I’m going to press enter and it created an empty file. If you double click it I have XCode installed so I can see it with line numbers. Or you’re probably more likely to have a TextEdit. Either way you have a file and can edit it.
Learn More: Rather than using vim to create an empty file, like above, there are two other commands you can use from the command line to make this blank file. They are:
touch myScript.sh– The touch command is used to create a file without any content. You can learn more about it in this GeeksforGeeks post: touch command in Linux with Examplesecho "" > myScript.sh–echooutputs the string, what’s between the quotes, that’s passed to it so in this case an empty string. Then the>writes the result fromechoto the filemyScript.sh. In this casemyScript.shdoesn’t exists so it creates it. If the file existed then using>would overwrite the contents for the file with your string. If you replace the>with>>if appends your string to the end of your file’s contents.
0:07:13.891 – I created this script and uploaded it into GitHub so I can show you how to grab it, but first, this script is missing something. It needs to be executable. To execute a file you go ./ and it doesn’t see your script here, because it doesn’t see (it) as an executable. But if I manually type it all in and press enter it tells me the file, myScript.sh, is not executable by this user. To make it executable you need to use chmod. Chmod will grant the user, u, the file execution permissions, x. So u to grant the user + (plus) x for execution. I’m going to press enter. And then, like before, I’m going to go ./ and automatically I can press Tab to auto-complete my script, because now it’s an executable file. If I press enter nothing happens the file is empty.
Learn More: 7 Chmod Command Examples for Beginners by Sathiya Moorthy on The Geek Stuff
Learn More: The Chmod Command and Linux File Permissions Explained by Joel Lee on MakeUseOf
0:08:05.241 – To add I’m going to go into vim again and I’m going to press i for insert mode. Insert mode allows me to type, delete, (and) basically insert your text.
0:08:15.204 – I am then going to drag over my browser for you and show you my SimplyKyra blog GitHub page. This is a public GitHub repository that I created to store any of the scripts or code, right now mostly just shell scripts as you can tell by the language down here, that I share on my blog. If you scroll down past Blogging Help you can see how I shared a Batch Resize and Compress Images script and also one that applies watermarks to your images. I figure anything that I create for my blog I’ll share with you.
Here are the direct links to my SimplyKyraBlog readMe and the script Upload_PNG_and_Directories_To_reMarkable.sh.
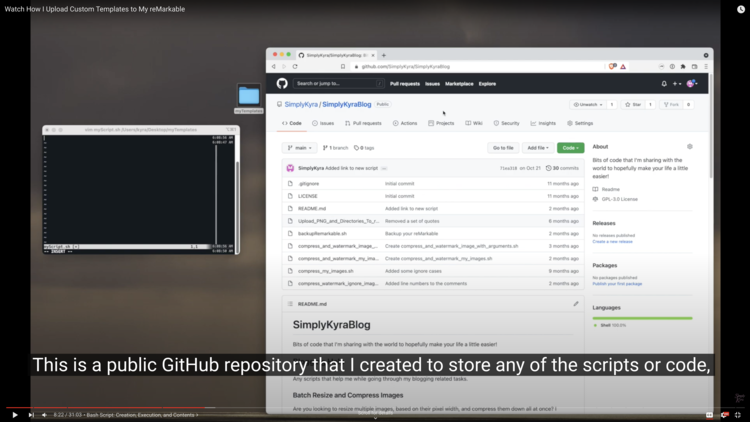
0:08:44.449 – Underneath (it all) is reMarkable. It then links to the four blog posts I made before:
- how to connect to your reMarkable via SSH
- how to switch out your reMarkable sleeps screen
- how to make template files for your reMarkable
- and my reMarkable updated. This is what I did next
0:08:58.480 – Next it mentions uploading a PNG image to the reMarkable and generating accompanying JSON snippet. This is what we’re doing here.
0:09:05.571 – Before you begin, as a quick aside, you may want to backup your reMarkable’s files. I have created a script that backs up using multiple ways I’ve seen people use online. I have never needed to restore my reMarkable, that said, I know I have the backup files if need be. If you want to use it you can; if you want to back it up a different way you can. I also mention backing up my reMarkable on, I think it was, Learn How to Access Your reMarkable Through the Command Line so you can always refer to How to Access Your reMarkable Through the Command Line and then, if you want, you can refer to the script to see if I do it a different way and you can do your own process. Just figured I’d mention that way if something gets messed up you can still, hopefully, recover.
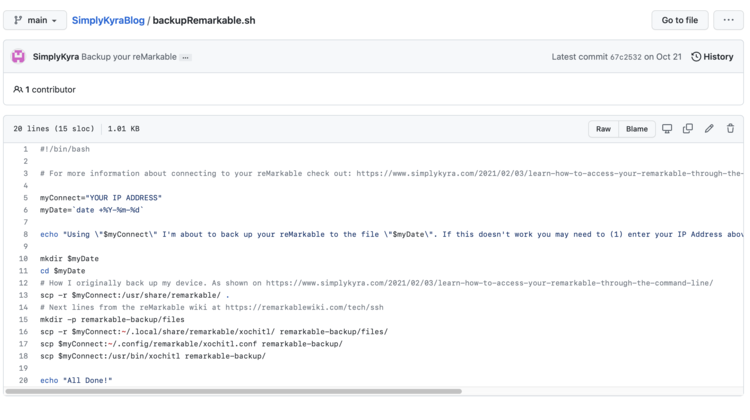
Learn More: I touched on backing up my reMarkable in my Switch Out Your reMarkable’s Sleep Screen… Plus Easily Back it Up post under First Backup Your reMarkable’s Software. I’ve since written a script to automate the process a bit more. The readme for this is on GitHub on SimplyKyraBlog under Backup Your reMarkable’s Files in One Easy to Execute Script along with the script itself: backupRemarkable.sh.
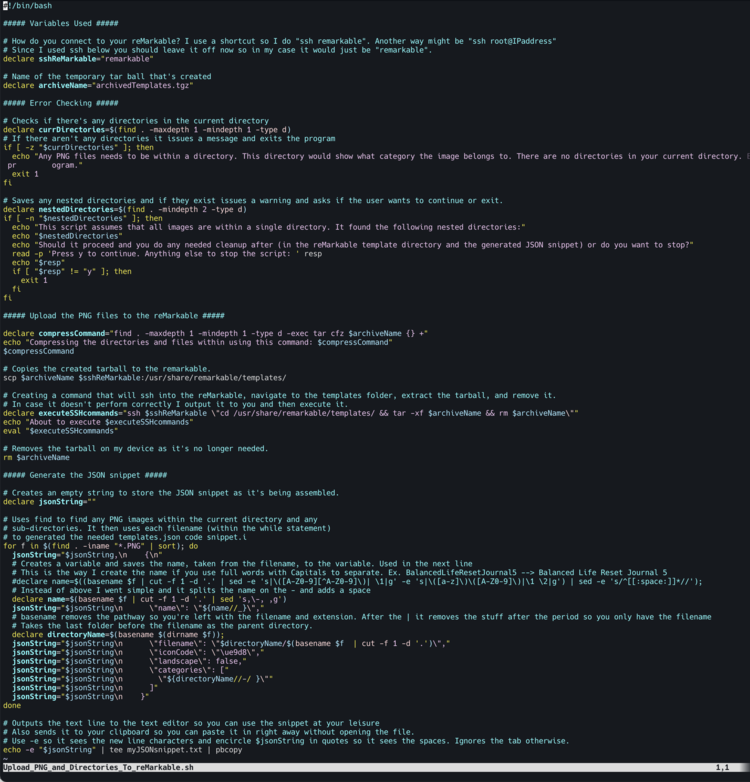
0:09:45.537 – Anyway, for the uploading your PNG images, I have a quick description, and then I have the file itself. You don’t need to input anything. The only thing (username and IP address) that changes between users will have to be manually changed within the code on line 7. It then lists my assumptions:
- For one each
PNG, the future reMarkable template file, needs to be in a single directory within the directory the program lives in. That’s why I made themyTemplatesdirectory (earlier). And then it needs to be in another directory, within that, which will become the templates’ category so if you want to match one already on your reMarkable you will need to name the directory the same name. If the image is in the same directory as the script, so if you put it inmyTemplatesand notCustomor2021in our case, the category will be assigned a period.This is because the script will see it’s location as (a) period because.meansthis directory. - Also your filenames can’t contain an extra period as I use a period to remove the extension from the filenames. Additionally, I haven’t tested it on the reMarkable to see how it works with a file with a period so just a heads up. Not sure. If you want to test it out and leave a comment I would love to know. I’m not going to take the time to figure it out right now.
0:10:54.238 – I also wrote two blog posts that go over this script in more detail. I split it into two as best as I could because one would’ve been way too long.
Part one (Quickly Generate a JSON Template Code Snippet for Your reMarkable) and part two (Quickly and Easily Upload Template Images to Your reMarkable)
0:11:02.420 – Anyway, I’m clicking Upload_PNG_and_Directories_to_reMarkable.sh. It opens my script. You can highlight it however you want with your mouse, but there’s this handy dandy little button that copies the raw contents to your clipboard. Checkmark means it’s done. We don’t need this anymore.
0:11:17.696 – I then go into this (the terminal) and we had already clicked i to show we can insert so.. I’m going to go command (cmd) and v and paste. I’m going to press escape (esc) to leave the insert mode :wq to save and quit.
0:11:36.372 – Just to quickly say if I went in here and changed random stuff and I want to save without quitting I can go escape (esc), colon :, no w, q for quit. (:q). If you don’t want them to ask you and you just want to quit without saving :q!. Just remember there’s no auto-saving so if you wanted to save halfway through your script you’d do just :w so just remember that everything you did since you opened or last saved won’t be saved but q!.
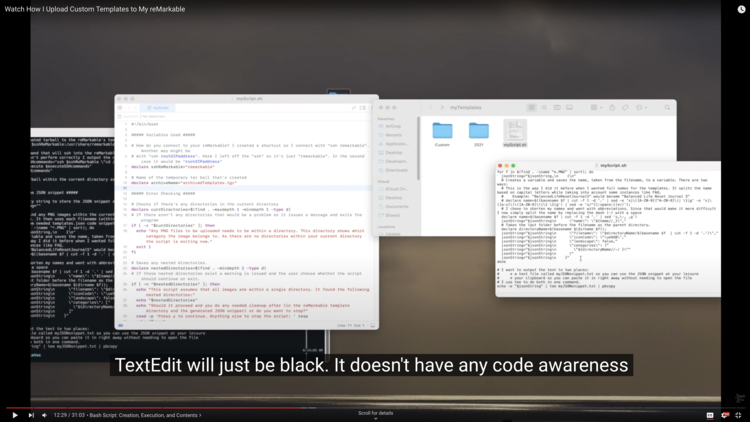
0:12:09.022 – If you just want to have the terminal list your script without anything else you can (cat myScript.sh). Here let’s make this bigger for you… Or, like before, if you double click it… for me it opens in XCode. You can get the color coding in XCode. Or you can open with TextEdit or Notes or whatever you want. TextEdit will just be black. It doesn’t have any code awareness. But here’s the XCode version. This script has comments, all in grey, so you can kind of have it explained what it’s doing. You can also use those two blog posts I mentioned to understand more.
12:45 – SSH Connection
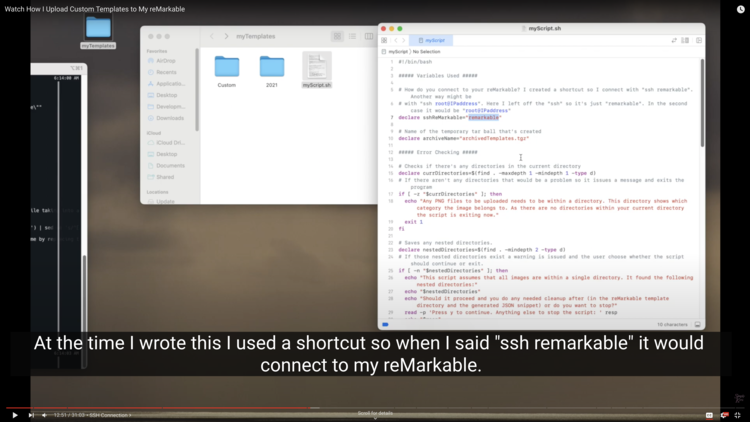
0:12:46.193 – At the time I wrote this I used a SSH key and set up the host in SSH config so when I said ssh remarkable it would connect to my reMarkable. This line, line 7, declares a variable called sshReMarkable and that is how you want to connect. This will need to be changed to root@ipAddress. So I’m going to quickly show you how to find root (your username) and IP address. If you want to learn more about this you can check out that first blog post.
My first post: Learn How to Access Your reMarkable Through the Command Line
Learn More: Wikipedia’s wiki for Secure Shell (SSH).
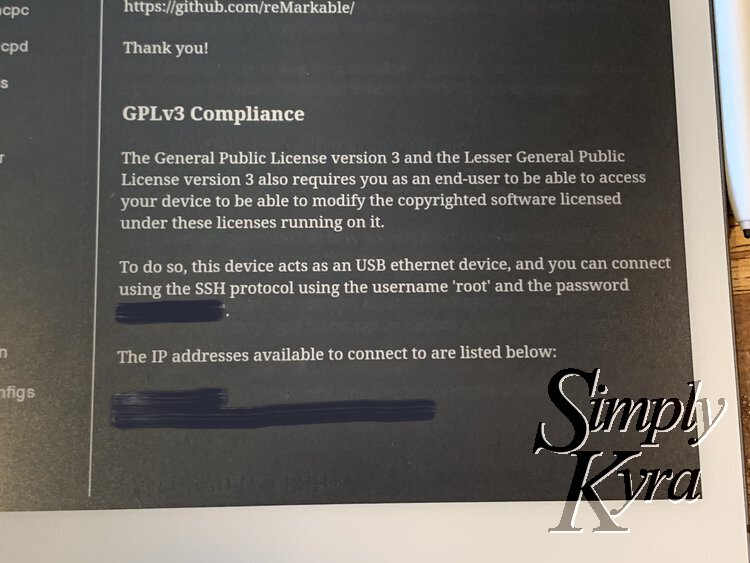
0:13:09.302 – But basically to find your username, which is root, your IP address, and your password you’ll need to go on your reMarkable. At the top left you’ll click the Menu and at the very bottom you’ll see Settings. The bottom, underneath General on the left side, you’ll see a question mark and Help. Click that and then it’ll say About. You’ll want that Copyrights and Licenses. You click on it. And you scroll down, or I guess on mine reMarkable now you don’t need to scroll anymore, and at the bottom you’ll see GPLv3 Compliance. In the bottom three paragraphs you will see your username, you’ll see your password, and, underneath it, you’ll see two IP addresses. You’ll want the shorter one (IPv4 not IPv6).
Learn More: WhatIsMyIPAddress.com’s IPv6 is Here and You Need to Know What It Is
0:13:46.445 – You might want to copy this onto your computer. That way you don’t need to actually look at your reMarkable to know your username and password and you can easily copy and paste it without having to type it out.
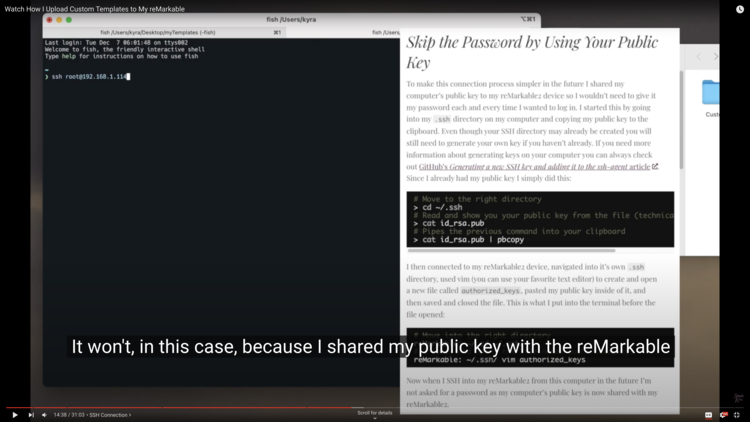
0:13:56.362 – As a quick aside… Let’s go into this I’m gonna create a new tab on my terminal and I’m going to go ssh root… Here let’s just delete. I was playing around with taring earlier. I’m going to go ssh root@192.168.1.114. This is how you connect to your reMarkable using ssh a secure channel over an unsecured network connecting a client and server. In this case you with your reMarkable.
0:14:27.348 – I’m going to stop right here, and not press enter, to go over several cases:
0:14:31.211 – If I press enter right now it might ask me for my password. It won’t, in this case, because I shared my public key with the reMarkable so it sees that I’m authorized to go into the reMarkable and I don’t have to remember my password. I’m not going to go into how to set it up right now. You can check on my SSH Connection blog post. That said, my script assumes you did this. My script will not store your password and I never tried to run my script without this public key shared. So you may need to do that first. That said, if you run my script and it works or doesn’t work without setting this public key I would love to know.
0:15:07.619 – If you have never connected via SSH with your reMarkable it’s going to ask you to confirm to trust this new connection. If you say yes it will connect for you and it will store this trust in the file in your dot ssh directory slash known host file (.shh/known_hosts).

.shh/known_hosts file.0:15:24.619 – If your reMarkable updates, or when it updates, if you connect via SSH again it will give you a warning that looks really scary but it’s basically seeing that this trust has been changed and it’s telling you which line it had added to the known host file (.ssh/known_hosts) and you need to go in and delete that line (and) save the file. If you’re opening that file in vim, when you’re not in insert mode, you can navigate to that line by colon : so, in my case, if this was my warning right now I’d open that file (.ssh/known_hosts) in vim, go :3 to go to line three, press d d (dd) and it will delete that line and then I’d press :wq and enter to save. Then if I try to connect again it won’t have that line in the known hosts file and it will ask me if I want to trust my source again. And then I’ll keep going through that every time it updates.
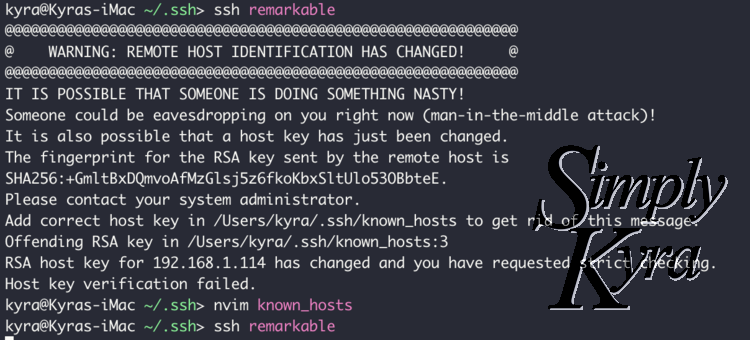
.shh/known_hosts file, remove the offending line, re-run the ssh command, and trust it again so a new line is added to the file.0:16:14.892 – In this case my reMarkable hasn’t updated recently. I connected to it just yesterday and I have my public key shared so when I press enter I’m automatically on my reMarkable.
16:27 – Sleep Screens Overview
0:16:27.744 – To go into the reMarkable templates directory I change directory (cd usr/share/remarkable) and you can always press tab for it to auto-complete if that’s the only thing with that name in that directory and then templates (cd usr/share/remarkable/templates).
0:16:42.806 – If I didn’t add templates (cd usr/share/remarkable) it would take me to the remarkable directory. That’s the directory where all the screen images are stored including the sleep screen image. The sleep screen image is called suspended.png. If you upload an image to that directory and name it suspended.png, so it overwrites the previous image, that will be your sleep screen. Restart your reMarkable. The new sleep screen will show. If your sleep screen image is a different size than your reMarkable (1404×1872 pixels) it will just be squished to fit.
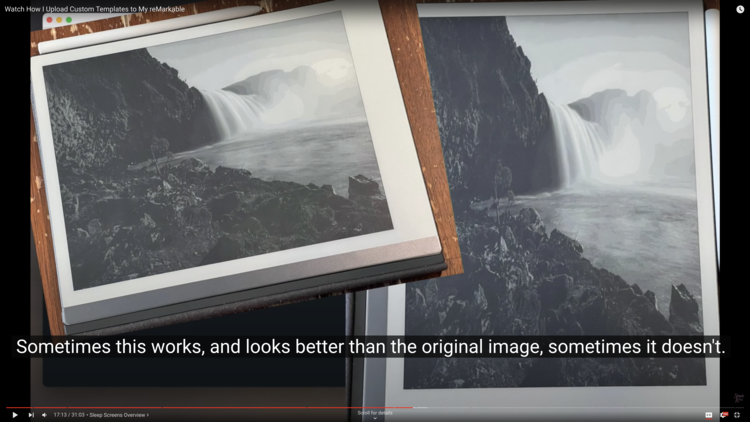
If you want more information about changing out your sleep screen image you can check out my post here. The same process can be used for your other screen images but I’ve personally only changed out my sleep screen suspended.png one.
0:17:10.326 – Sometimes this works, and looks better than the original image, sometimes it doesn’t. And you can always upload one in landscape and just rotate your reMarkable if you want a landscape one showing. Same thing with portrait.
17:21 – Navigation and Images
0:17:22.129 – I’m going to press enter and ls to list all the directories… I just remembered I still have my files from doing this before so I’m just going to remove 2021 and remove Custom and remove templates_backup.json.
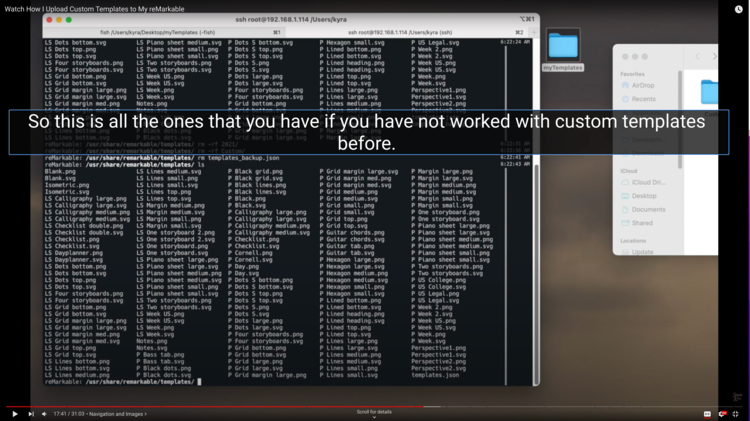
0:17:39.490 – So this is (edit: these are) all the ones that you have if you have not worked with custom templates before. As you can see each file is listed twice. There’s a PNG and an SVG file. PNG is a portable network graphic. It’s a pixel based image which means it will degrade if you’re zooming into the image. An SVG image is a scalable vector graphic meaning its vector based thus it does not degrade and you can zoom in as much as you want.
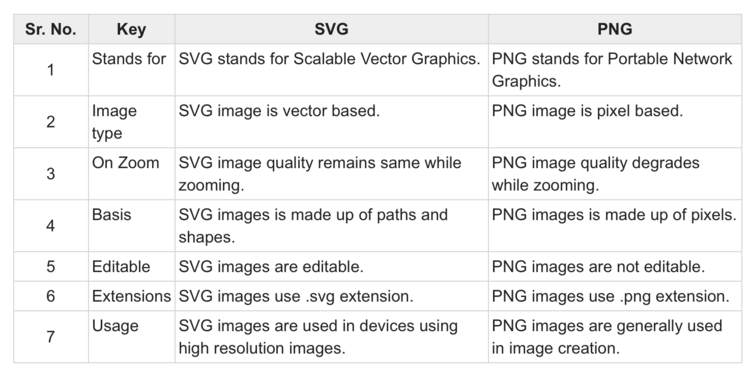
0:18:06.258 – When I’ve been making custom templates I’ve only been uploading PNG files and I haven’t needed to upload SVG files. I haven’t noticed a problem. That said, I’ve seen online that people hypothesized that the SVG file is used when exporting your notebook as a PDF. Like I said, I haven’t had a difficulty. I haven’t looked into if I should do both. That said, if you do upload an SVG to go with your PNG it needs to be in the same directory as your PNG and named the same thing, the only difference being the extension, because they use the same filename to find both files.

18:40 – Backup Templates File
0:18:40.297 – If you want to do a quick backup you can say cp, for copy, templates.json and then let’s call it backup_templates.json so in all cp templates.json backup_templates.json. If, for some reason, you want a space you can always do a slash space (cp templates.json backup\ templates.json). This slash is showing that it’s a space in your filename and not a different word. It’s still part of your filename. I’ve never actually tried to do that on the reMarkable. See. And then as you can see if I cat that file, for instance, I’m not going to actually, but it adds a slash when you’re auto-completing (cat backup\ templates.json). I created this cause then if anything happens you have your backup templates file to compare your templates file with to see what might be wrong.
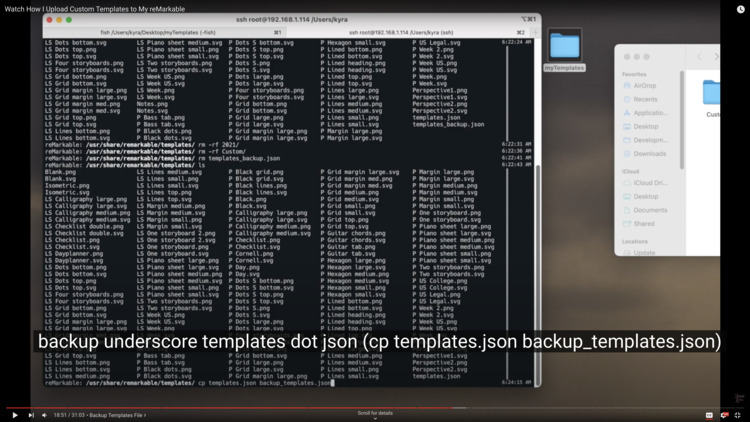
0:19:24.380 – Now that that’s been shown I’m just going to go back… here. Oh! Also if you don’t like how messy this is you can type clear and press enter and it looks like it wipes everything but as you can see by the scroll bar you just have to scroll up to see more.
19:38 – Editing the Script
0:19:38.695 – So going back to the script. You’re going to have to replace this. Oh, I’m just going add… If you want to leave your reMarkable you can just type exit.
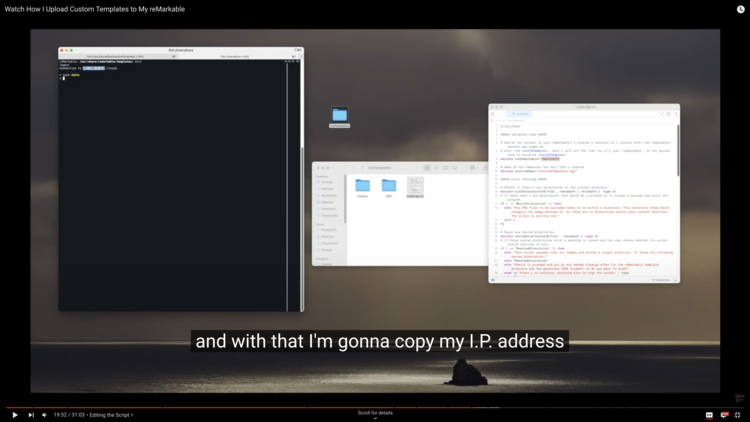
0:19:50.539 – And with that I’m gonna copy my IP address and go over here and you don’t have to say ssh first, in fact you shouldn’t, because I say ssh below. This is just what comes after the space after the ssh. So in my case it would root@192.168.1.114 And then I’m going to save the file and you could even close it. If I did this through the terminal, of course, I’d go :wq. And with that done your script should be fine to go.
20:19 – Running the Script
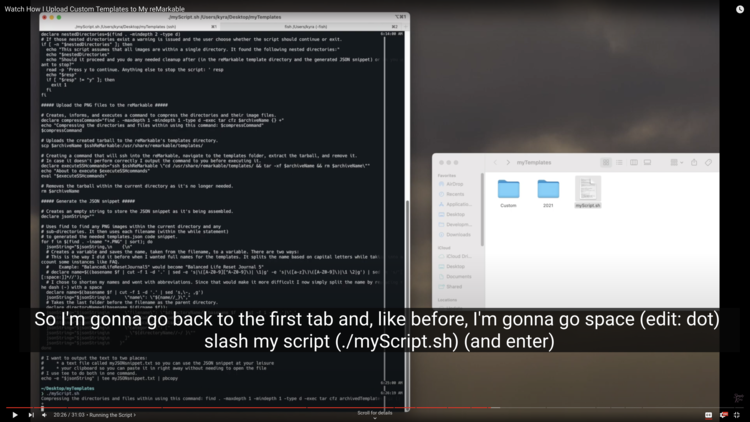
0:20:20.351 – So I’m gonna go back to the first tab and, like before, I’m gonna go ./myScript.sh (and enter) and it’s compressing the directories and files and then it’s uploading that compressed directory to the reMarkable. And then in one line it executes ssh root@192.168.1.114 and then on that connection it cds, changes directories, into your templates directory, it extracts that tarball it made on your computer, and then it removes that tarball.
0:20:48.530 – So if we go back into your reMarkable and change directory into /usr/share/remarkable/templates and then go ls we will see that 2021 folder and the Custom folder… and the templates. If you want more information you can go ls -la. If you want all the information including the subdirectories you can go ls dash R for recursion (ls -R), and I’m going to combine it together as ls -Rla. This way you can see all the information including the 2021 directory and it’s contents and the Custom directory.
0:21:25.103 – Right now, on my Mac, my user ID is 501. This is new but I think when I compressed the file and uploaded it it sees me as a user ID that was on the Mac while I compressed the file. On the Linux reMarkable device it associates that ID with dialout instead of me the user. If I SSH in and uncompress the file it would be as root. I haven’t noticed a problem with having a 501 dialout.
Learn More: The Eclectic Light Company The 501 orphan problem: why you shouldn’t delete the primary admin user
Learn More: If interested I used this GitHub Drupal-vm 501 dialout Files and Folders issue to figure out my issue as “They aren’t changed to anything. That’s the representation of your host computers files group id and user id on the vagrant box through NFS. Eg the id matches on some of them.”
0:21:53.295 – I recently also noticed these dot underscore files. I think it has something to do the Mac preview image. I’m not 100% sure. I’m going to go in and change how I compress all the files so this won’t be there. That said, I’m recording this video now because I know editing will take awhile. So I’m just going to go remove 2021 slash dot underscore asterisk (rm 2021/._*). It’s going to remove all the files that start with dot underscore in that directory. And then I’m going to go and do the same thing with Custom and then I’m going to go ls -Rla and you will just see the files you want.
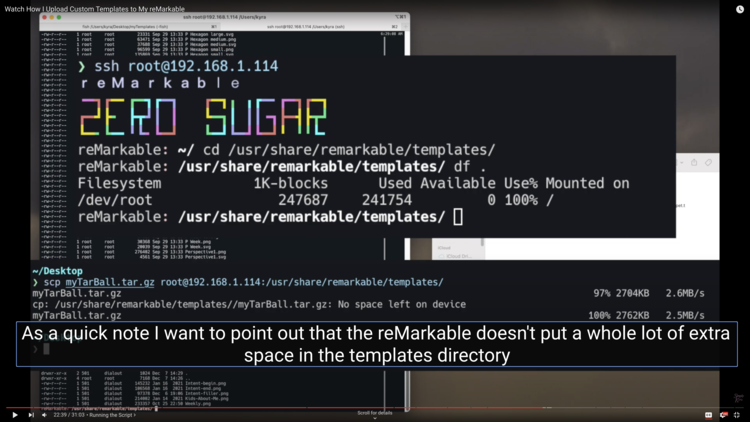
0:22:35.162 – As a quick note I want to point out that the reMarkable doesn’t put a whole lot of extra space in the templates directory so if you want to add lots of custom templates you may run out of room eventually.
22:47 – JSON Code Snippet
0:22:47.675 – So you’ve uploaded your images, our templates.json file is still not edited, but our script generated the code snippet. As you can see here each (image) file had a template section created. It shows the name of the file by replacing the dashes with spaces. It shows the filename. It shows the icon code. It shows that it’s a false landscape (so in portrait mode) and it belongs to the 2021 category.
![Screenshot of the video shows the newly created JSON snippet file opened. This overlaps with the terminal showing the contents of the templates directory. In the window this snippet file is highlighted with the mouse overtop. The caption says "So you've uploaded your images, our templates.json file is still not edited, but our script generated the code snippet. [mouse clicks]"](https://www.simplykyra.com/content/images/wordpress/2021/12/compressed_Screen-Shot-2021-12-13-at-12.40.24-PM.png?resize=750%2C422&ssl=1)
0:23:09.948 – When the script ended this (edit: the) contents of the file was also placed on my clipboard, but just in case I’m going to copy it. That said, if you don’t lose your access to your clipboard you don’t even need to open this file and if I ran the script again later, because I added another image or something, this would be regenerated. So over here I’m going to go vim
0:23:30.773 – Oh a quick aside. Over here I’m going to edit in vim but first I heard about another edit program called Nano. That you might find easier to navigate in. So if you go nano and the name (nano templates.json) it will open the file in nano and at the bottom you can see commands. So it’s supposed to teach you how to use this. First thing I want to say is that it says ^X to exit. X does not have to be capitalized. It’s just pressing the x button. And ^ is not pressing carrot; it’s pressing control (ctrl). So in this case if I wanted to exit I’d press ctrl x.
Learn More: I personally haven’t used Nano before but here is How-To-Geek’s The Beginner’s Guide to Nano, the Linux Command-Line Text Editor
0:24:02.181 – I am more experienced in vim even though I’m by no means an expert. I forget how to navigate all the time. So I’m going to go into vim templates.json and then if I press gg really quick I go to the top (and) G goes to the very bottom. If I highlight this bracket I can see it matches with the one above and as I can see there are two brackets at the bottom that need to be kept the same. I’m gonna press insert (i) and that allows me to go past the bracket and then I’m gonna paste my new code and then I’m going to press delete one more time for that empty space. And there we go. Escape w q (esc :wq enter) to exit.
![Screenshot of the video shows the terminal on the left with the custom JSON code pasted in. On the right the code snippet file is highlighted. The caption at the bottom says "and then I'm going to press delete one more time for that empty space. [button presses]"](https://www.simplykyra.com/content/images/wordpress/2021/12/compressed_Screen-Shot-2021-12-13-at-12.41.18-PM.png?resize=750%2C422&ssl=1)
0:24:38.559 – I’m gonna cat templates.json file (cat templates.json) for a second here (are) the categories, you can have multiple categories, so the square brackets means categories is an array of strings, in this case it just has Custom.
0:24:51.486 – So the PNG files are uploaded, the template file (templates.json) has been saved…
24:53 – Restart Device
0:24:55.481 – But the reMarkable still won’t see the custom templates because it needs to be restarted so it reads the JSON file.
0:25:02.265 – So, if you have done this before, a really handy command is control r (ctrl r). It lets you search your previous commands and I’m gonna type xo and it’s gonna find it. (ctrl r xo enter). I’m gonna press an arrow to the right and it leaves the search.
0:25:14.667 – So basically to restart your reMarkable you’ll have to run this command “systemctl restart xochitl“. And you can’t see anything happening, but right now my reMarkable is restarting and loading and when it opens up I can check to see if the templates are there.
![Screenshot of the video shows the terminal with the restart command "systemctl restart xochitl" typed in right after the arrow was tapped in the search. The caption below says "So basically to restart your reMarkable you'll have to run this command "system c t l space restart space x o c h i t l" [keyboard presses] (systemctl restart xochitl)"](https://www.simplykyra.com/content/images/wordpress/2021/12/compressed_Screen-Shot-2021-12-13-at-12.41.58-PM.png?resize=750%2C422&ssl=1)
25:29 – Templates Shown
0:25:32.469 – I’m gonna quickly go to the top menu and only show my notebooks so it’s easier to find. I’m going to click a notebook and if I swipe through I can see my templates are still there. If you go to a page and press layers (icon) and Template you can see all your templates and at the top of mine I now see all 2021, Creative, Custom, Grids, Life/Organize, and the last one is hidden behind the Portrait radio button so maybe I should not add two custom categories.
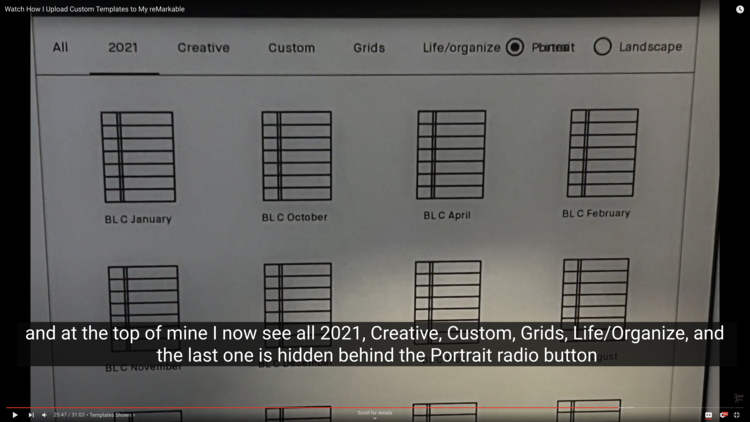
0:25:57.289 – If I go into 2021, or Custom, all the templates I see listed have a lined paper as their icon code, but the names let me tell them apart.
26:04 – Error: No Templates Found
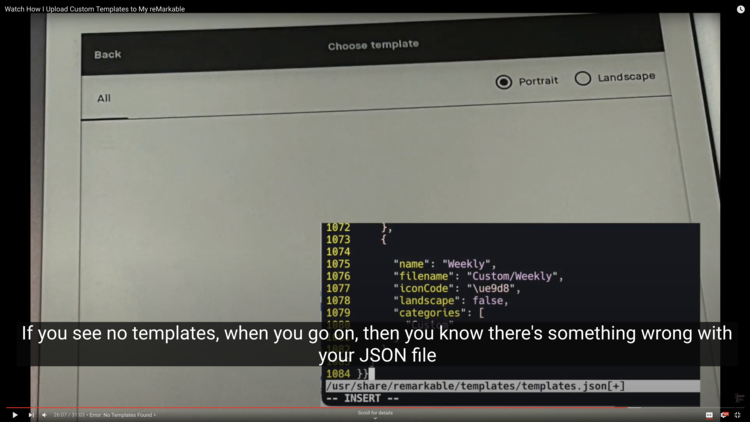
0:26:04.877 – If you see no templates, when you go on, then you know there’s something wrong with your JSON file whether it’s a mismatched bracket or something else. I know when I was playing with icon codes if I had a double slash (\\ue9d8) in the text it wouldn’t read the JSON file properly and I’d have no templates.
0:26:21.128 – If you’re having an issue and you can’t see what your problem is there are online JSON websites that let you check your file by copying and pasting your code into it, seeing if there’s any problems, fixing it, and then pasting it back in. If your JSON had personal data in it I wouldn’t recommend it but this is just all about your templates so I don’t think you’ll have a social security number or anything listed.
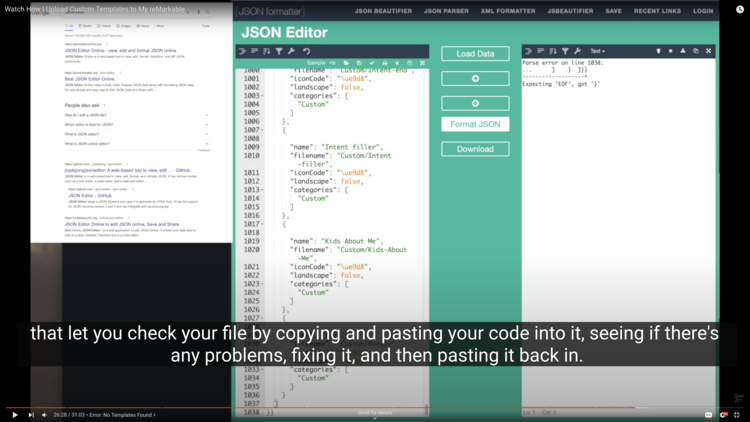
For the video I went to JSON Editor Online (jsonFormatter.org) for this example and screenshot. There are lots of websites listed if you do a search.
0:26:42.570 – And that’s how I upload my templates now.
26:46 – Templates Not Officially Supported
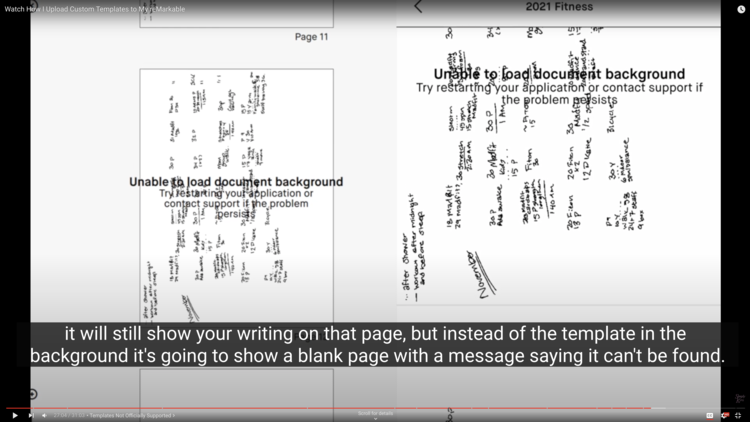
0:26:45.438 – Before I let you go I just want to quickly go over what I mentioned before about reMarkable not officially supporting (custom) templates. This means if you go onto your computer or phone application and go into a notebook that uses one of your custom templates it will still show your writing on that page, but instead of the template in the background it’s going to show a blank page with a message saying it can’t be found. This has nothing to do with not having an SVG file. This is just the reMarkable not supporting it. I’m not sure what their behind the code way is but that’s how it works.
0:27:18.156 – The other issue is the reMarkable updates. When the reMarkable is updated it reverts any sleep screen images, or any screen images, to their original one. It also removes any of your custom templates, in your templates directory (/usr/share/remarkable/templates), and reverts your JSON script (edit: file). This means, after an update, if you go into your templates you will no longer see your custom templates.
0:27:38.066 – This is why I keep two versions of this folder around whether I delete this or not. That’s basically an empty directory that just has my script. That way if I want to add one more file to 2021 or one more template to Custom I can just create a Custom or a 2021 folder, add the PNG, and just upload that one and add that one’s template code to my templates.json. I then keep one like this around so if (edit: when) my reMarkable updates I don’t have to go hunting for any of my calendar pages or for any of my custom templates and I can just run my script then I have my JSON snippet on my clipboard and I repeat these steps to add it to my templates.json file and I restart my reMarkable and it’s back working.
0:28:24.374 – Because I have not changed any of the category or directory names and I haven’t changed any of these file names it automatically hooks up to my notebook once I restart. If I, for example, change this Kids About Me title before I ran it after the update it would have a new name, it would have a new filename, and the reMarkable wouldn’t see that template as the same as the old version and I would have to manually reconnect it on every page I used it on. This makes it way simpler than it was before manually having to figure out the JSON or keeping your manually created JSON snippet on hand. With my script I can just delete this and it doesn’t matter because I can just run my script again.
0:29:04.043 – Also you don’t have to worry if you’re rerunning it because these files if they get put on your reMarkable again it will just overwrite the old version, or it won’t even overwrite, I can’t remember BUT you won’t have two copies of it (edit: unless you add it to the templates.json file twice. Then there would be two. Just remove one section leaving the other and you’d be good.)
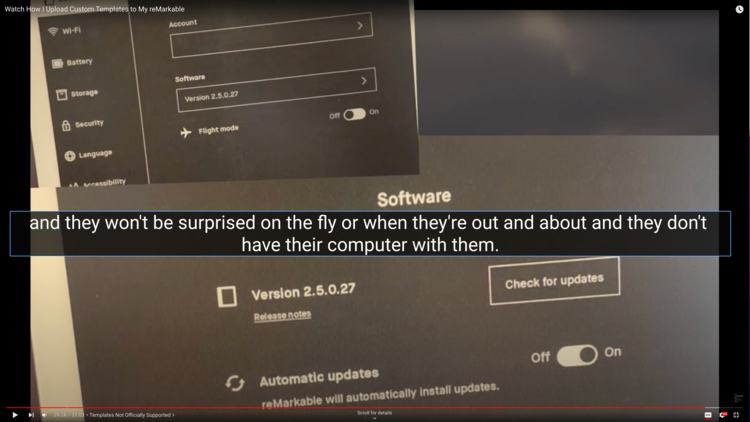
0:29:15.674 – I’ve seen some people, on Facebook, who like to turn off their automatic updates so that they know when the update will happen because they are manually going in and checking for updates and they won’t be surprised on the fly or when they’re out and about and they don’t have their computer with them. I have not turned off my manual (edit: automatic) updates because I figure I can just rerun my script when it updates. That said, if I am out and about, or something, and I don’t want to run the script right away but there’s one of the pages I really want to access to I can quickly just manually change the template on that page to a blank page or a lined page or one of the default pages and I will be able to see my writing and I can estimate based on my writing where I should write the next thing. Say if it’s a weekly template and that’s where the next day’s is or I’m writing in my calendar so just right next to the text before and then later when I run these templates (through the script) and fix the template I can manually change that page back and then just move around the texts so it makes sense.
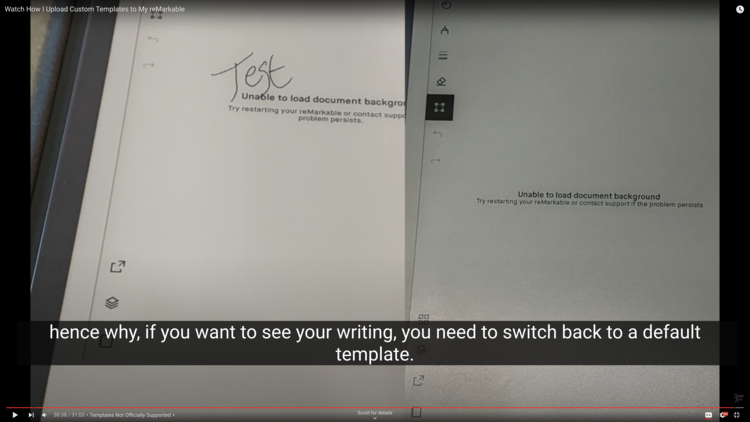
0:30:15.783 – That said, when there is an update the reMarkable used to be like when you’re in the app. You used to still be able to see your writing. Since the last update (edit: or recently) I’ve noticed that when you open a notebook and the page flickers you can see your old template with the writing but as soon as it loads fully you just see a blank page with the message and your writing is not visible. Then if you navigate within the notebook you don’t even see that flicker hence why, if you want to see your writing, you need to switch back to a default template.
30:41 – Conclusion: Thanks for Listening
0:30:41.861 – I think that’s all the information I have to share with you today. If you want to see more I will create a blog post with all these closed captioning so that you can navigate to that if you just want to scroll through specific sections. I will also link all my previous blog posts if you want any of this stuff in more detail. And comment if you have anything you want to share about your process
0:31:02.341 – Have a great day!
I hope this video and walkthrough helps you upload and maintain your own custom templates. Feel free to share what your process is in the comments below and maybe it can help someone else. I'd love to hear your tips and tricks. Hope you're having a great day and your week is going well!
If you’re interested in getting any of my future blog updates I currently come out with a new one every Wednesday and share them to my Facebook page and Instagram account. You’re also more than welcome to join my email list located right under the search bar or underneath this post.
Did this save you time?

