

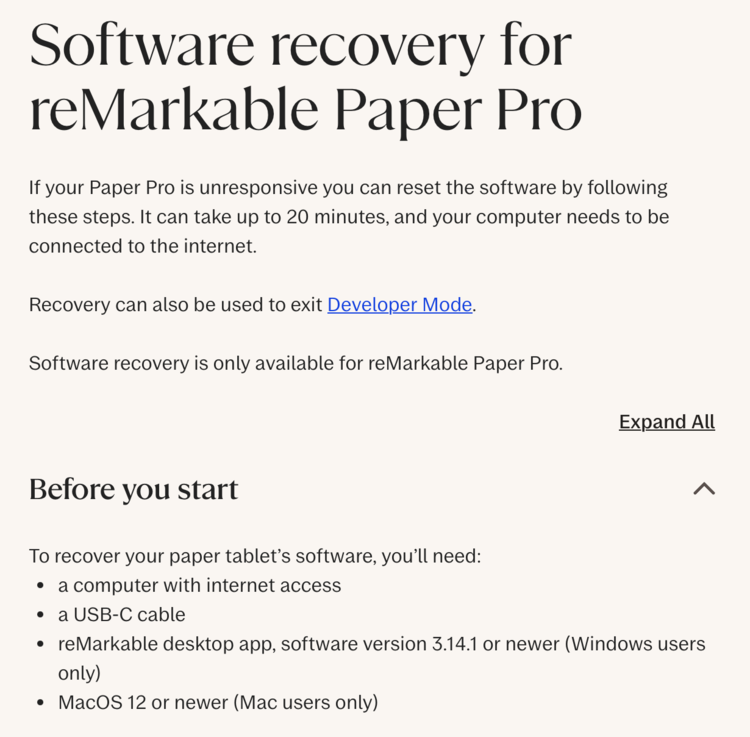
Learn How to Access Your reMarkable Paper Pro Through the Command Line

I recently bought the new reMarkable Paper Pro and realized that there were way more steps to get through compared to the reMarkable 2, which I posted about in 2021, so I wanted to share how I connected in case it can help you too!
When I first heard about the reMarkable Paper Pro coming out I told myself I didn't need it... and then I realized I needed to know how it could connect to my Simply Customize It app and I suddenly needed to buy it. It has since arrived and I wanted to share how I connected to it as it may help you too whether you already bought it or are collecting information to help make your decision.
Simply Customize It
Several months ago I came out with an Apple app that allows you to connect to your reMarkable 1 or 2, switch out the screens, and add custom templates. I have no affiliate with reMarkable and found, since working on the new reMarkable Paper Pro, that it seems as if they're trying to make it impossible to add custom templates and switch out your screen images. Right now I was able to connect and switch out the sleep screen images using my app. Once I figure out templates I'll push an update for all of you. If you sign up for the Simply Customize It newsletter, by creating a free account here, you'll be messaged whenever there's an update about this app, Simply Customize It specifically.
That said, to use Simply Customize It on the reMarkable Paper Pro you will need to put your reMarkable into developer mode and turn on the WLAN setting. Anything beyond that isn't needed but, understandably, that is a lot of steps for custom templates and screen images. Additionally, I don't know what future reMarkable software updates will bring.
Update: Simply Customize It how works with the reMarkable Paper Pro. Get more information about the app here

Let me know, in the comments below or via email mail@simplykyra.com, what you're interested in having in the app and, depending on the interest I can maybe prioritize it.
Warning
Before continuing I need to warn you that setting your reMarkable into developer mode will reset it and you'll have to do the introductory onboarding steps again. I have a Connect account so I was able to re-download all of my files once I was logged in again.
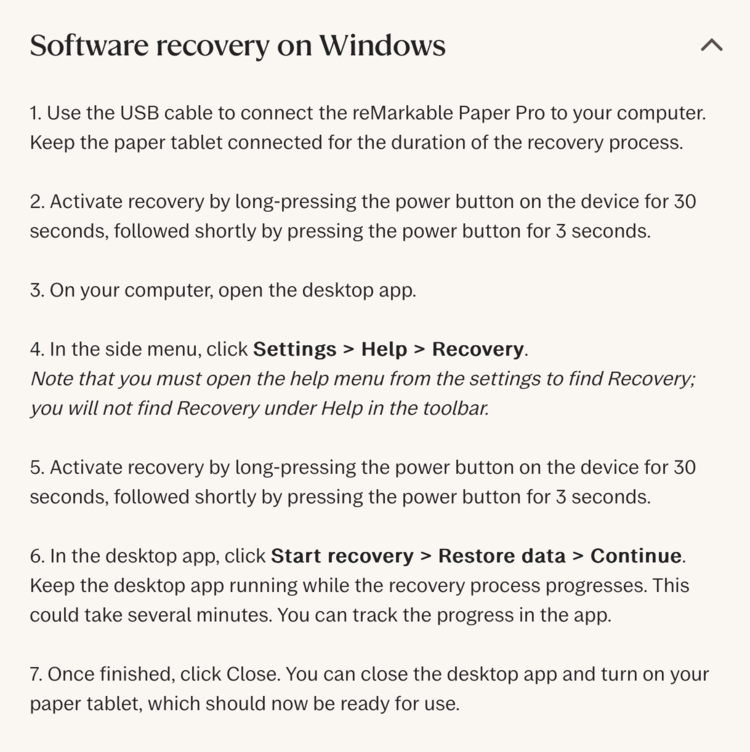
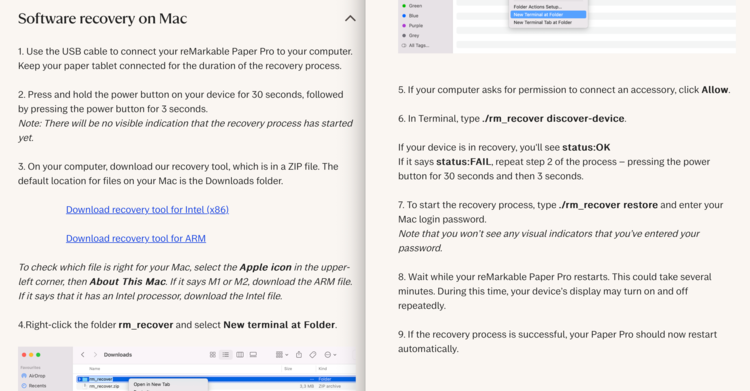
Additionally, although I have entered developer mode for the SSH capabilities on my reMarkable Paper Pro I have not researched what else might change when you go into that mode although the company, while going through this process, does warn you repeatedly about device security and to not store any sensitive data on your device. Additionally, I have not tried to exit developer mode and as such cannot offer advice about that beyond linking you to the reMarkable support where I found the post Developer mode for the reMarkable Paper Pro which then links to Software recovery for reMarkable Paper Pro.
TLDR
Be aware that this is now more difficult to do, reMarkable warns against it, and the remarkable and templates directories as now readonly. I have turned on developer mode and the ability to SSH over WLAN on my device and I haven't attempted to turn it off. According to reMarkable support you will need to do software recovery (shown above) to turn off developer mode in the future and, again, I have not attempted to do that. All said...
- To turn on developer mode go to
Settingsand underSoftwareclickVersion xxx. From there toggle advanced, developer settings, and then follow the directions. - Once the reMarkable is rebooted plug it in over
USBand use the login credentials now shown underGPLv3 Compliance. - To turn on
WLAN, once connected viaSSH, type inrm-ssh-over-wlan on.
If you want something a bit more wordy than above and more streamlined than below you can now check out the first five or so steps in:
Steps for SSH Capabilities
Update: For both the reMarkable 1 and 2 you do not need to turn on developer mode or WLAN. When you find the GPLv3 compliance the connection information will be there without needing developer mode turned on. Developer mode was added to the Paper Pro and without it the connection information is hidden.
Find the GPLv3 Compliance
Hit the menu button (three horizontal lines) in the top left corner then Settings at the bottom. With General at the top highlighted click About, under Help, and then Copyrights and licenses.
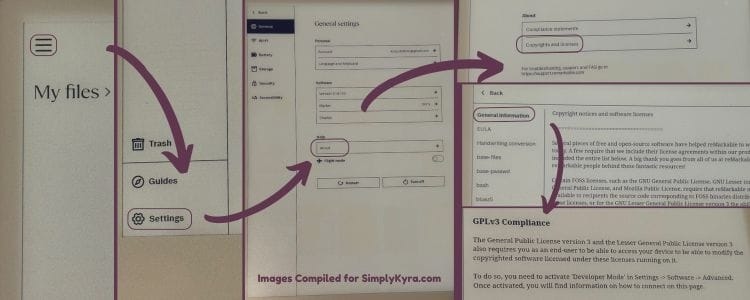
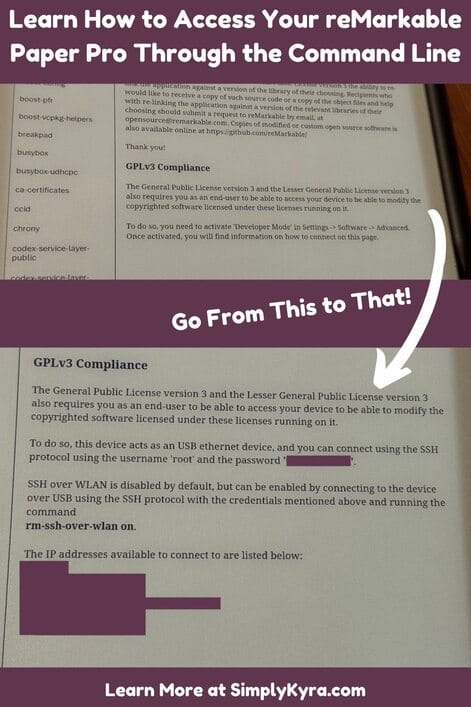
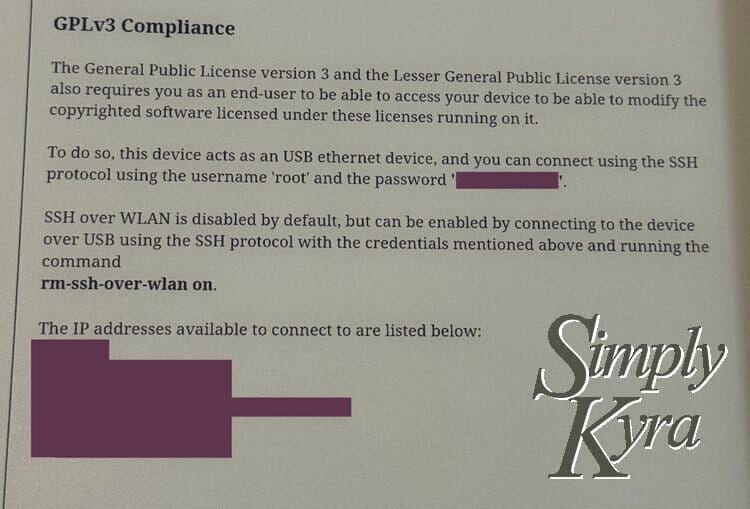
With the previous reMarkable devices you'd now see the connection information listed under the GPLv3 Compliance near the bottom. This has been updated with the following message:
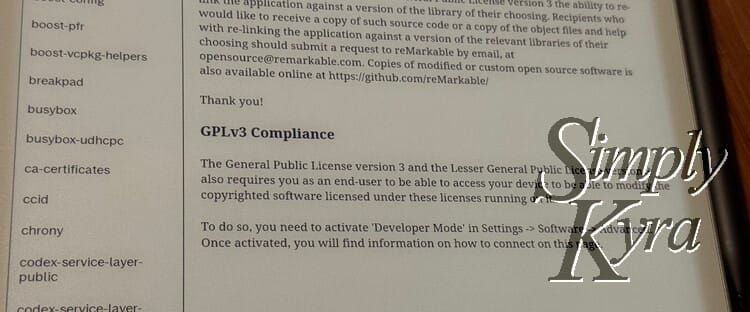
The General Public License version 3 and the Lesser General Public License version 3 also requires you as an end-user to be able to access your device to be able to modify the copyrighted software licensed under these licenses running on it.
To do so, you need to activate 'Developer Mode' in Settings -> Software -> Advanced.
Once activated, you will find information on how to connect on this page.
Turn On Developer Mode
From here you'll need to go back twice to general settings where the Help -> About was, but now, instead, you'll want to go up a section and click the Version part under Software. The toggle beside Advanced will be, by default, off so tap the toggle to open the advanced area. At the bottom of the resulting list is Developer mode, tap that to see information about Developer Mode. At this point you'll be presented with several informational are you sure? screens where you hit Continue until you have a final confirmation by pressing the power button twice.
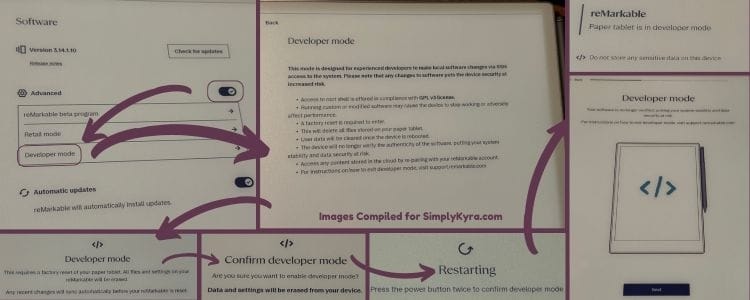
Once done there's new text between the Advanced and Automatic updates toggles letting me know to go to support to learn how to exit developer mode.
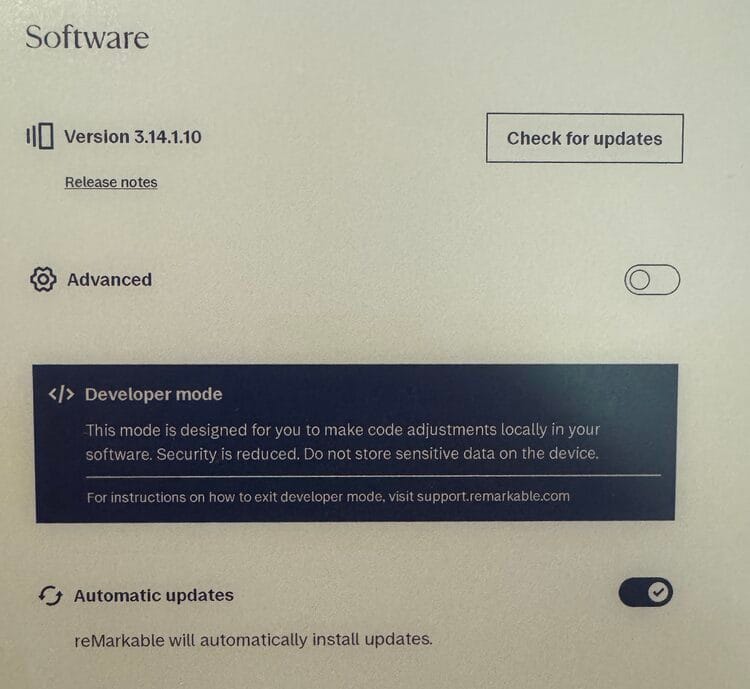
This mode is designed for you to make code adjustments locally in your software. Security is reduced. Do not store sensitive data on the device.
For instructions on how to exit developer mode, visit support.remarkable.com
For screenshots and links to reMarkable support check out the warning section above.
For Later: Turn off Developer Mode
I haven't tried to turn off developer mode yet but wanted to track down exactly how to do it in case you ever need it. Going to support and searching for Developer Mode got me to this post, Developer mode for the reMarkable Paper Pro, that then linked to Software recovery for reMarkable Paper Pro. For screenshots of this reMarkable support page check out the warning section above.
Find the Login Credentials
From there I was able to repeat the steps above (menu -> Settings -> About -> Copyrights and licenses) to go to the GPLv3 Compliance section but now, in developer mode, I can see my log in credentials including my username root, my password, and a list of IP addresses.
Now we can SSH into our reMarkable Paper Pro... but ONLY if we're connected to our reMarkable through our USB ethernet cord. At this point we cannot connect to our reMarkable if it isn't physically plugged in. That ability still needs to be enabled by turning on WLAN.
SSH over WLAN is disabled by default, but can be enabled by connecting to the device over USB using the SSH protocol with the credentials mentioned above and running the command rm-ssh-over-wlan on.
Before going over that lets....
Connect via SSH
Quick aside: I'm on my Mac computer so my directions will assume you're on a Mac as well. Linux and Windows (using Bash) should be comparable but it's been awhile since I've attempted to log in to my reMarkable 2 through Windows so I can't tell you how it may differ. That said this part is comparable to the reMarkable 2 so you can check out my older post for an earlier take.
Anyway, to connect to your reMarkable you will need to physically plug in, via USB, from your reMarkable Paper Pro to your computer unless you've turned on WLAN already (explained in the next section). Either way make sure your reMarkable is turned on.
Now on your computer open up the terminal. If you don't know where it is you can simply press command cmd and the spacebar to open up spotlight and search for terminal. Once in you can use the login credentials from the previous section to type in ssh [username]@[host/ip address] and hit Enter before it asks for your password.
Be aware that the host can change on your reMarkable so if it no longer works go into settings and see if it's been updated to something different. Also when you connect the first time you will be asked to authenticate the authenticity of the host (IP address) you entered. Continue on by saying yes and, once you're in, you can simply type in exit to be logged out. So for me this looked something like:
❯ ssh root@192.168.1.42
root@192.168.1.42's password:
The authenticity of host 'host (host)' can't be established.
This key is not known by any other names.
Are you sure you want to continue connecting (yes/no/[fingerprint])? yes
Warning: Permanently added 'host' () to the list of known hosts.
root@host's password:
root@imx8mm-ferrari:~# exit
logout
Connection to 192.168.1.42 closed.
Just be aware when you're typing in your password you won't see the characters typed as you go so if you're getting it wrong and/or need to see what you're typing you can type it out elsewhere, temporarily, before using copy and paste to put it into the terminal.
Turning on WLAN
Once you're connect to your reMarkable, via SSH, you can turn WLAN on by typing in rm-ssh-over-wlan on.
❯ ssh root@192.168.1.42
root@192.168.1.42's password:
root@imx8mm-ferrari:~# rm-ssh-over-wlan on
running: systemctl restart dropbear-wlan.socket
ssh over WLAN enabled.
root@imx8mm-ferrari:~#BasicallyWLAN stands for wireless local area network and with it turned on you can SSH into your reMarkable without needing to physically attach the reMarkable to your computer with the USB cord. You will still need to be on the same WiFi connection as your computer.
As an aside if you enter rm-ssh-over-wlan help you get this:
root@imx8mm-ferrari:~# rm-ssh-over-wlan help
Usage: /usr/bin/rm-ssh-over-wlan on|off|help

Commands:
  on     - Enable ssh over WLAN.
  off    - Disable ssh over WLAN.
  help   - Print this help message.

Description:
This script manages the ssh over WLAN setting by creating or deleting
a marker file at the appropriate location based on the target system.
Use 'on' to enable ssh over WLAN and 'off' to disable it.
root@imx8mm-ferrari:~#
Beyond Basic SSH
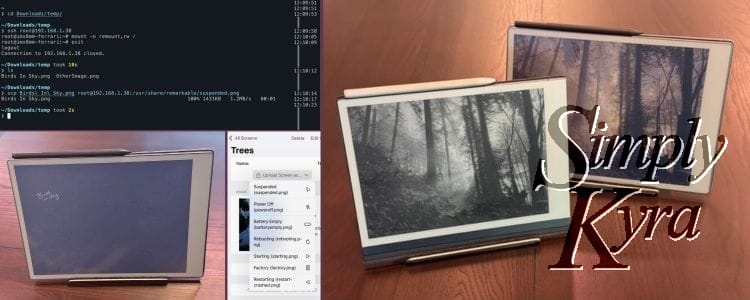
In case you're interested I wanted to go beyond the basic SSH capabilities especially since once I did these steps I came to the disappointing but understandable conclusion that both directories (/usr/share/remarkable/ and /usr/share/remarkable/templates/) are readonly systems so at this point you wouldn't be able to add images or even save an edited templates.json file.
❯ ssh root@192.168.1.42
root@imx8mm-ferrari:~# cd /usr/share/remarkable/
root@imx8mm-ferrari:/usr/share/remarkable# mkdir temp
mkdir: can't create directory 'temp': Read-only file system
root@imx8mm-ferrari:/usr/share/remarkable# cd templates/
root@imx8mm-ferrari:/usr/share/remarkable/templates# mkdir temp
mkdir: can't create directory 'temp': Read-only file system
root@imx8mm-ferrari:/usr/share/remarkable/templates#
To demonstrate the current state here is me going in and attempting to create a directory..
Optional: Public Keys and Shortcuts
Before going into that I wanted to share that you can simplify your log in process. I find looking up and typing in this password each time gets annoying so one of the first things I did with my new reMarkable Paper Pro was to share my public key to skip that pesky password. Although I personally chose to skip creating a shortcut this time around you could further simplify the process and instead of ssh root@host type something like ssh remarkable to connect. If you're interested in either you can check out my old reMarkable 2 connection post under the public key and shortcut sections.
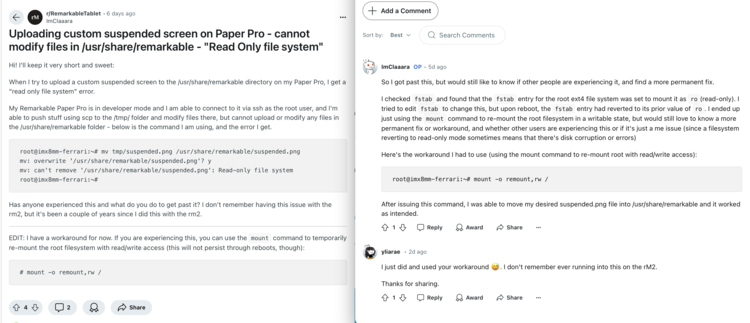
Getting Past the Readonly
While trying to figure out how to overcome the readonly setting on the directories we came across this post by ImClaaara on Reddit.
Uploading custom suspended screen on Paper Pro - cannot modify files in /usr/share/remarkable - "Read Only file system"
by u/ImClaaara in RemarkableTablet
Decision? reMarkable Paper Pro vs reMarkable 2
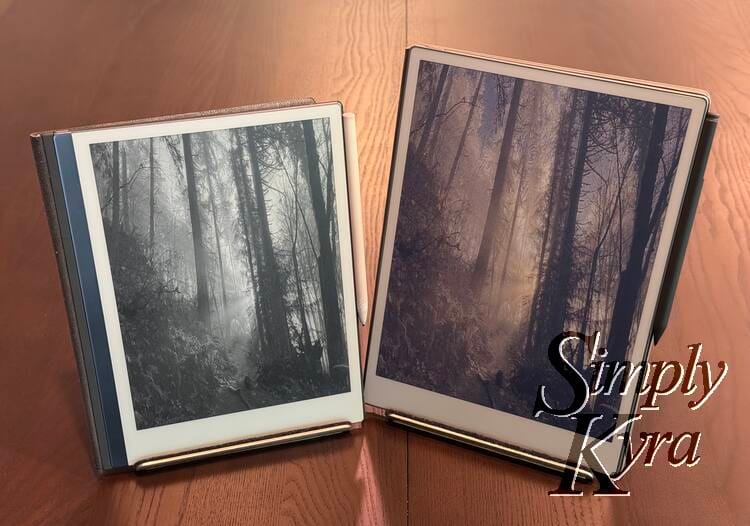
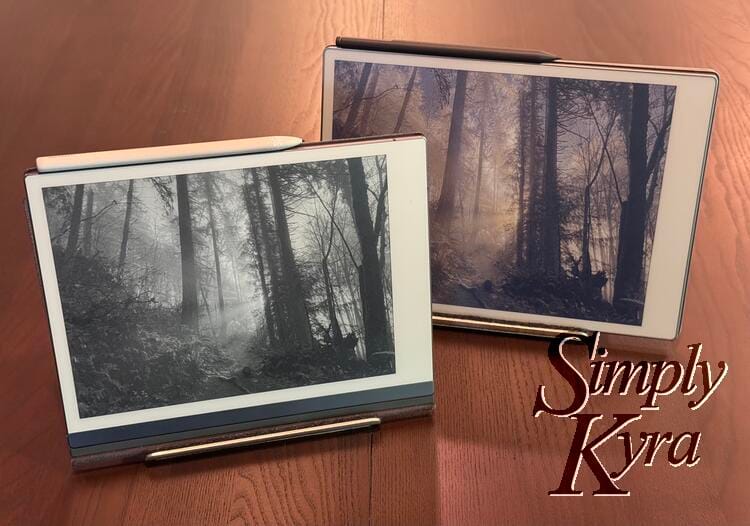
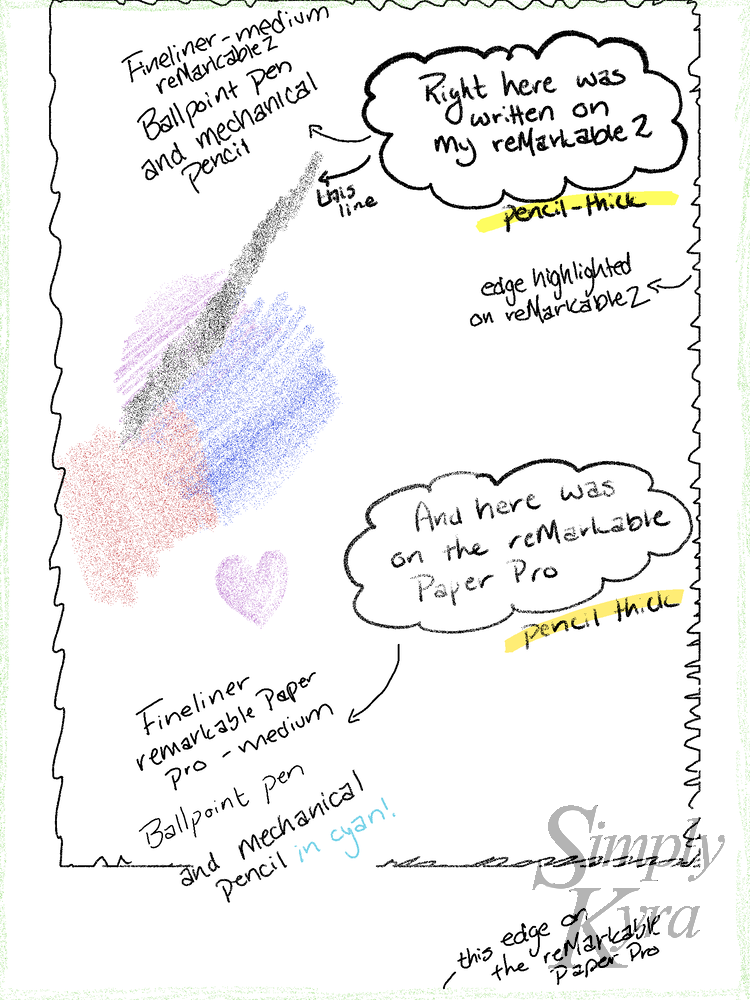
Lots of people are online posting comparisons and the like. With the reMarkable Paper Pro (2160 x 1620) being larger than the earlier reMarkables (1872 by 1404) I figured I'd create this image showing both the reMarkable devices' edges and how it centers when synced between the devices.
With that I'm going end this longer than expected post but I hope it helped you out whether you simply want more information about how to SSH, are delving in further, want to know what to expect before you hit the button, or even are simply considering if you want to purchase it or not. Either way I hope this does truly help you out and you’re having a wonderful day.
If you’re interested in getting any of my future blog updates I normally share them to my Facebook page and Instagram account. You’re also more than welcome to join my email list located right under the search bar or underneath this post.